
‘The Switcher Chronicles’ - Screen Shots
Confession, I FORCED my wife to be a “switcher”. Yes, I forced her to start using OS X, because Christmas 2012 I purchased a new laptop for her at her request (she didn’t specify a brand… and um… yeah… I’m not buying a PC). This may come to a shock for some people as:
- Using a Macintosh has been my primary choice since 1995 when I was a Music Major at Ball State University.
- How can a Mac Only user of the past five years (not really touching anything more recent than XP) be married to someone who HATES OS X!?
TL;DR She’s stubborn.
I’m now the 24/hr Apple helpdesk and the target of “why does Apple do this” questions, so I thought to make the best of the situation and start documenting items for future switchers or admins of switchers.
First up, Screen Shots
Issue
Screen Shots is a interesting item, because Mac users really despise most Windows users solution to screen shots which is “embed a picture into a word document”. Note to all Windows users, this is WRONG (send the picture, not a word document with a picture). To better understand why this predicament exists, let’s dissect the difference between the two platforms between the “Screen Shot Capturing” user’s perspective vs. the end recipient:
Windows Users
Taking a screen shot is easy and that is the key element of windows user’s behavior, the method of getting a screen shot is very simple for Windows users as it involves a keyboard button.
How much easier can it be than ‘push this button’ if I want to get a screen shot?
The issue is that “Print Screen” button captures the picture to the clipboard, and that is where most Windows users begin to the horrible idea of embedding this picture into a document which compresses the image and degrade quality.
Mac Users
Mac users have the excellent output of saving their screen shots automatically to the Desktop. You just need to make sure you can contort your left hand to hold one of the keyboard combinations to take that picture. Even Apple describes the ability to capture screen shots as:
Okay, you probably already know the ol’ Command-Shift-3 shortcut for taking a screen grab of your entire screen, and you may even know about Command-Shift-4, which gives you a crosshair cursor so you can choose which area of the screen you want to capture. But perhaps the coolest, most-secret hidden capture shortcut is Control-Command-Shift-3 (or 4), which, instead of creating a file on your desktop, copies the capture into your Clipboard memory, so you can paste it where you want. Apple
“just use the ol’ Command-Shift-4 w/ a spacebar”, that is what makes things difficult for a switcher.
Solutions
There are a couple of solutions for a Switcher, it just depends on what they want to perform:
-
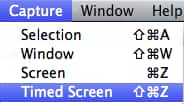
Grab; You can place the Grab Application (in the Utilities folder) in the dock and let the ‘switcher’ know that anytime (s)he needs to take a screenshot, just start this application as there are plenty of options in the Capture dropdown menu option.
-
Preview; if your ‘switcher’ want to modify the files such as placing text or arrows on the screen shot, Preview may be a good choice as you can use the File => Take Screen Shot menu option and use Previews Annotate options under the Tools menu dropdown.

-
Automator; This requires a little work for yourself, but it solve two things that I didn’t like about the other two options:
- Grab would take up a Dock icon placement. Why crowd that area?
- Grab and Preview are additional applications to open when most likely the switcher want to instantly take a screen shot of the application they are currently using. Why open a separate application?
A simple Automator script would allow your switcher to use the Services option in every application to grab their screenshots. Yes, this may take away some of their options, but did they have any options when using the “Print Screen” button?
Here are the steps:
- Create a new “Service” (the one shaped like a gear) Automator document
- Select “Run Shell Script” as your only workflow item
- At the top, Service receives “no input” which is the last item in the dropdown field and be sure to leave the “Any Application” which is the default setting.
- Copy/paste this code
fileDate=`date '+%Y.%m.%d-%T'`
screencapture -ioW ~/Desktop/ScreenShot_"${fileDate}".png
This will capture the current application that is running in interactive mode with the “window capture” mode as default vs. the cross-hairs. It will save the resulting file to the user’s desktop with the current date/time stamp just in case they are taking multiple pictures.
Save the workflow which will prompt for a name, choose something simple like “Screen Capture Window” and it will now be available for every application that your switcher uses under the “Application Name” => “Services” => “Screen Capture Window” (something easy for them to remember and repeat as needed).
Comments are closed. If you have a question concerning the content of this page, please feel free to contact me.


Comments
RoadNinja
Maybe you won’t be living in a house divided much longer!